Determine Your Vision Problem
Visit to the eye doctor
A visit to an eye doctor is the simplest way to determine your vision problem. We should mention, however, that not every doctor takes vision exercises seriously — don't let this discourage you. The purpose of this visit is solely to determine your vision problem, and that is what you should ask your eye doctor for. This includes not only basic problems like nearsightedness or astigmatism, but also convergence problems, strabismus (including hidden forms), and amblyopia (lazy eye). It is therefore worth choosing a thorough doctor who will assess all of your vision problems.
During an eye examination, the doctor will usually also check the pressure inside your eyeball (intraocular pressure) and determine whether you suffer from diseases like glaucoma, cataracts, etc. In case of an atypical or severe vision problem, ask your eye doctor if you can safely perform the exercises presented here.
Computerized vision test
An eye doctor will usually perform a computerized vision test to make a preliminary assessment of your vision impairment. During this examination, astigmatism in particular is measured accurately — usually more precisely than a doctor can gauge it unaided. It's best to choose a well-regarded optician or optical shop to ensure that the equipment is up to date and the results aren't too distorted. However, even if the results deviate slightly from reality, this doesn't concern us, because we only want to know the scale of the problem for the generator. We also advise against undergoing this type of examination too often just to check whether your vision has improved. The minimum interval should be six months, and preferably one year. You don't need a machine operated by another person (sometimes better, sometimes worse) to gauge your progress. Your body, your eyes, and the experience of seeing well will tell you whether the techniques are working. Hanging a Snellen chart in a room with steady lighting is also enough to track your progress.
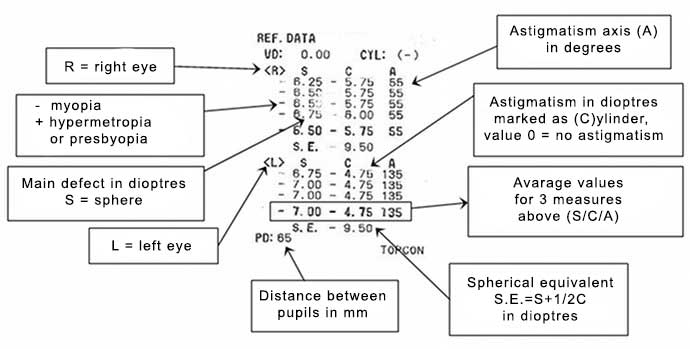
- Nearsightedness and its measurement in diopters (S column with a minus sign)
- Farsightedness or presbyopia and its measurement in diopters (S column with a plus sign)
- Astigmatism, its measurement in diopters (C column), and the axis in degrees (A column)
- Eye: (R) for the right eye or (L) for the left eye
- Distance between pupils in millimeters (PD mark)
- Average values of three measurements (S/C/A)
- Spherical equivalent (S.E.) = S + 1/2 C in diopters
Self-determination of vision impairment
Although we sincerely encourage you to use the methods described above to determine your vision problem, we will now provide ways to do it yourself. Remember that self-determination of vision problems can be highly inaccurate, but we're not looking for precision, just identifying the type and size of the problem, which will allow you to use the generator on our website and create a set of exercises.
Determining the basic vision defect
Usually, we shouldn't have a problem determining the basic vision defect. If we have trouble reading at close distances, we have farsightedness (if under 40 years old) or presbyopia (if over 40 years old). If, however, our vision problems occur at long distances, and we have no trouble reading up close, we suffer from nearsightedness.
We can determine the basic vision defect more accurately with a Snellen chart by placing it 6 meters (20 feet) away and trying to read the line of letters marked 6 m. If we can do this, we don't have a problem with nearsightedness. However, if we cannot read the letters in the 20/20 (6 m) row, we check which row we can read. Say it's the row marked 20/40 (12 m): this means we already have mild nearsightedness — we can read from 6 m what healthy eyes read from 12 m. As a rough guide for the generator, the smallest row you can read indicates roughly: 20/25–20/40 mild nearsightedness, 20/50–20/70 moderate nearsightedness, and 20/100–20/200 severe nearsightedness.
Perform the test above with each eye separately to find the difference between the two eyes. If the difference is large — greater than one row on the chart — we have a "lazy eye" (amblyopia).
Determining astigmatism
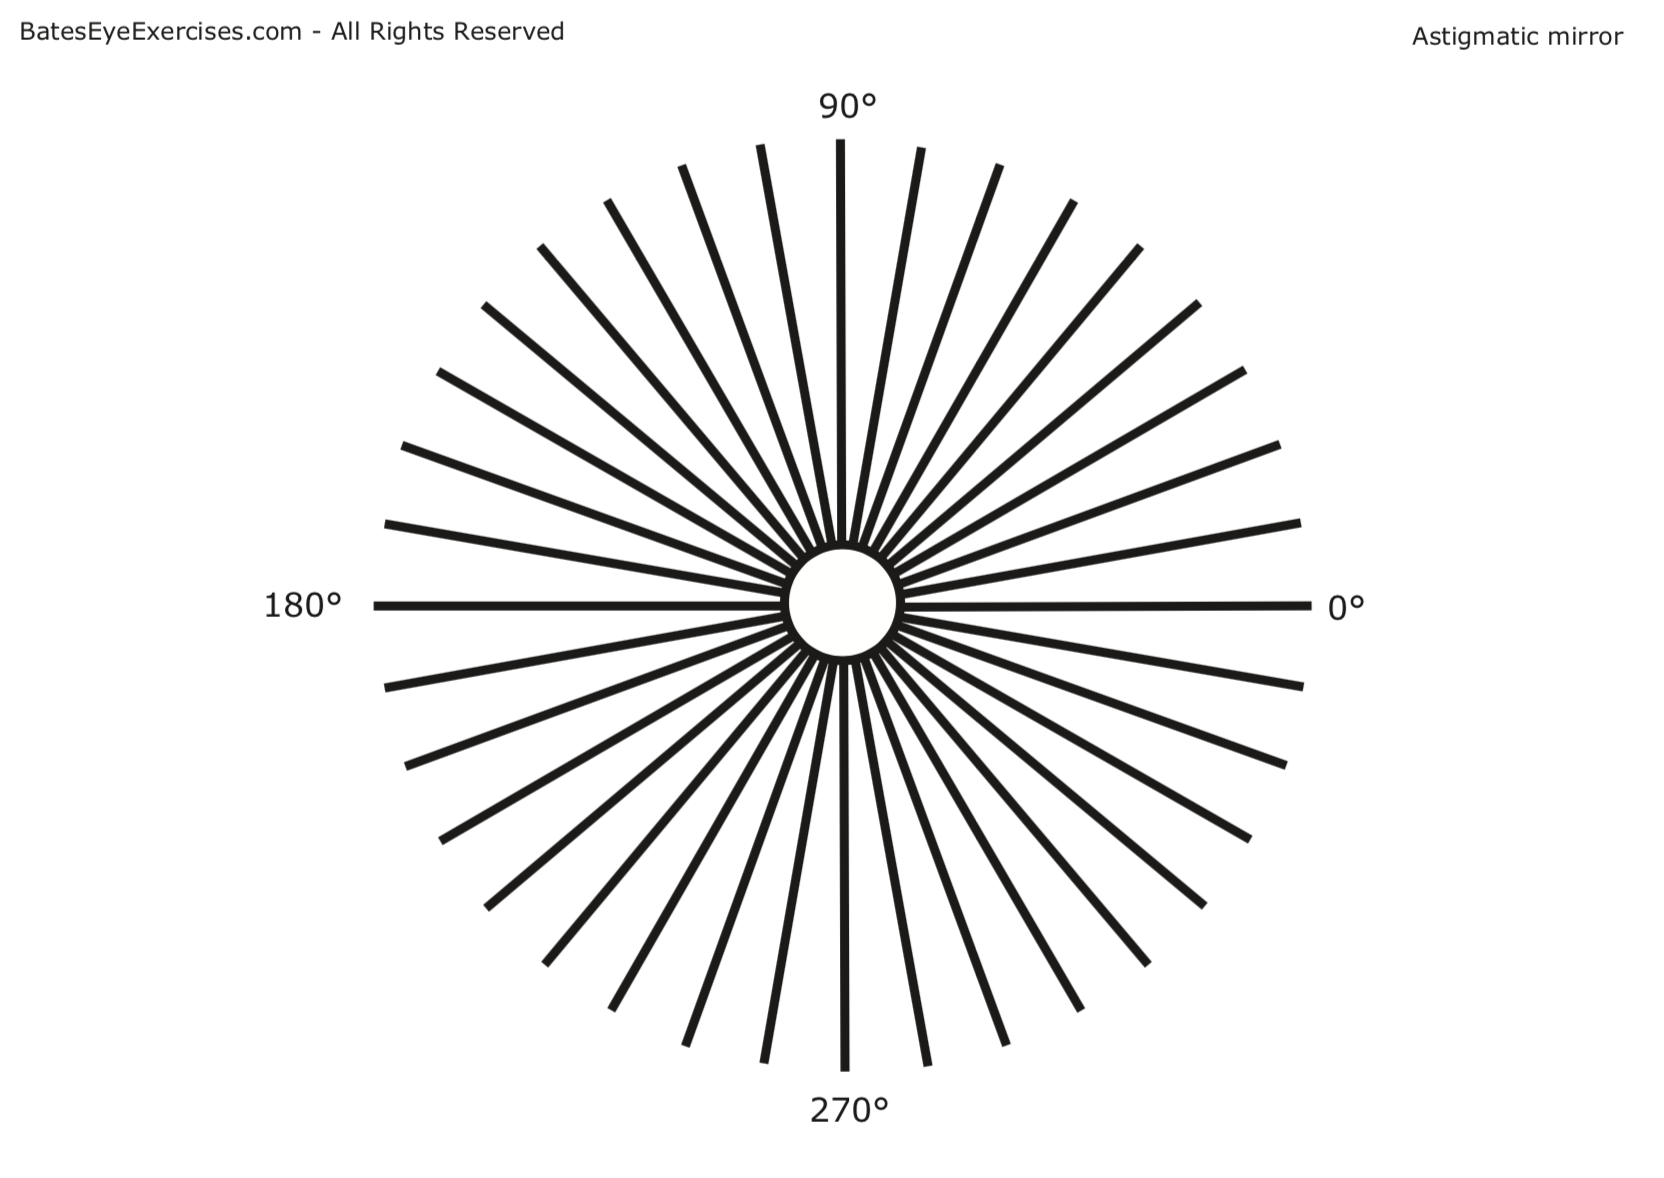
To check for astigmatism, we will use the "astigmatic dial" image. View it on a monitor or a printed chart from a distance where you can see the lines clearly. If you have astigmatism, some lines will look darker, thicker, or more sharply defined than the others. If all the lines look equally even and equally black, you don't have to worry — astigmatism is not your problem. Now look at the astigmatic dial from different distances, as some people have astigmatism only at certain distances. Choose a distance at which the image is otherwise sharp; results outside that range are unreliable.
The astigmatic dial is also useful for tracking your progress against astigmatism. You can use it after each astigmatism exercise to see how the exercise affects the quality of your vision.
Determining eye convergence issues
To determine problems with eye convergence, we will use a string or elastic cord.
To check if we have proper coordination and convergence of our eyes, we attach one end of the string to a door, for example, and hold the other end in our hand at the tip of our nose so that the string is taut. We place a few markers (e.g., beads) on our string, at equal distances. When you look at any bead, you should see phantom lines that cross exactly where the bead is. Some people see these phantom lines with the bead as an X, others as a Y or an A. The shape is not as important as the fact that the lines should converge perfectly at the bead's location. If the lines converge before or behind the bead, you have an issue with eye convergence.
Now look at the next beads, each time checking the point of eye convergence. If the phantom lines converge perfectly at the bead in every position, you don't have to worry — eye convergence problems don't affect you. If you did notice a problem, don't be discouraged: convergence can be improved effectively through exercises, which we highly encourage.
The test described here is also a good way to check whether your convergence exercises are working and how quickly your vision is returning to normal.
Determining strabismus issues
A large strabismus is obvious enough that recognizing it is no problem. For proper exercise, it is important to determine the type of strabismus — that is, the direction in which the eye deviates. With small deviations or hidden strabismus, the affected person is often unaware of the defect. Everyone should therefore be checked for it, as early detection usually means easier and faster treatment.
It is easiest to assess this defect with the help of another person, who can readily tell whether one of our eyes deviates, veering off to one side. For the test, it's best to use a book or a card, asking the person being tested to look at a specific word or letter. Place it about 20 cm from the person's face and gradually move it away. At each distance, carefully observe whether the eyes are convergent and whether one of them shows strabismus.
You can also use the cover test: alternately cover the left and right eye, preferably with a square piece of paper, moving it slowly from one side to the other. In hidden strabismus, the deviating eye reveals itself the moment it loses binocular vision — watch the eye closely as the paper slides off it, and you may catch it drifting back into alignment.