Strabismus / convergence exercises
Convergence theory

Healthy eyes have a natural ability to converge on an object being viewed in such a way that the image is centered in the macula. You may have noticed that when viewing close objects, your eyes naturally converge, while when viewing distant objects, your eyes align nearly parallel to each other. In both cases, our vision has an extraordinary ability to keep both close and distant objects in sharp focus. Of course, this applies only to healthy vision without convergence disorders.
Proper convergence allows for a deep and accurate perception of depth. The brain automatically combines the images from the right and left eyes into a single three-dimensional whole. This ability helps us, among other things, judge how far away objects are. Untreated convergence problems can lead to the development of strabismus, either convergent or divergent.
You can find more information about this condition here
Exercise Z1. Convergence charts exercise
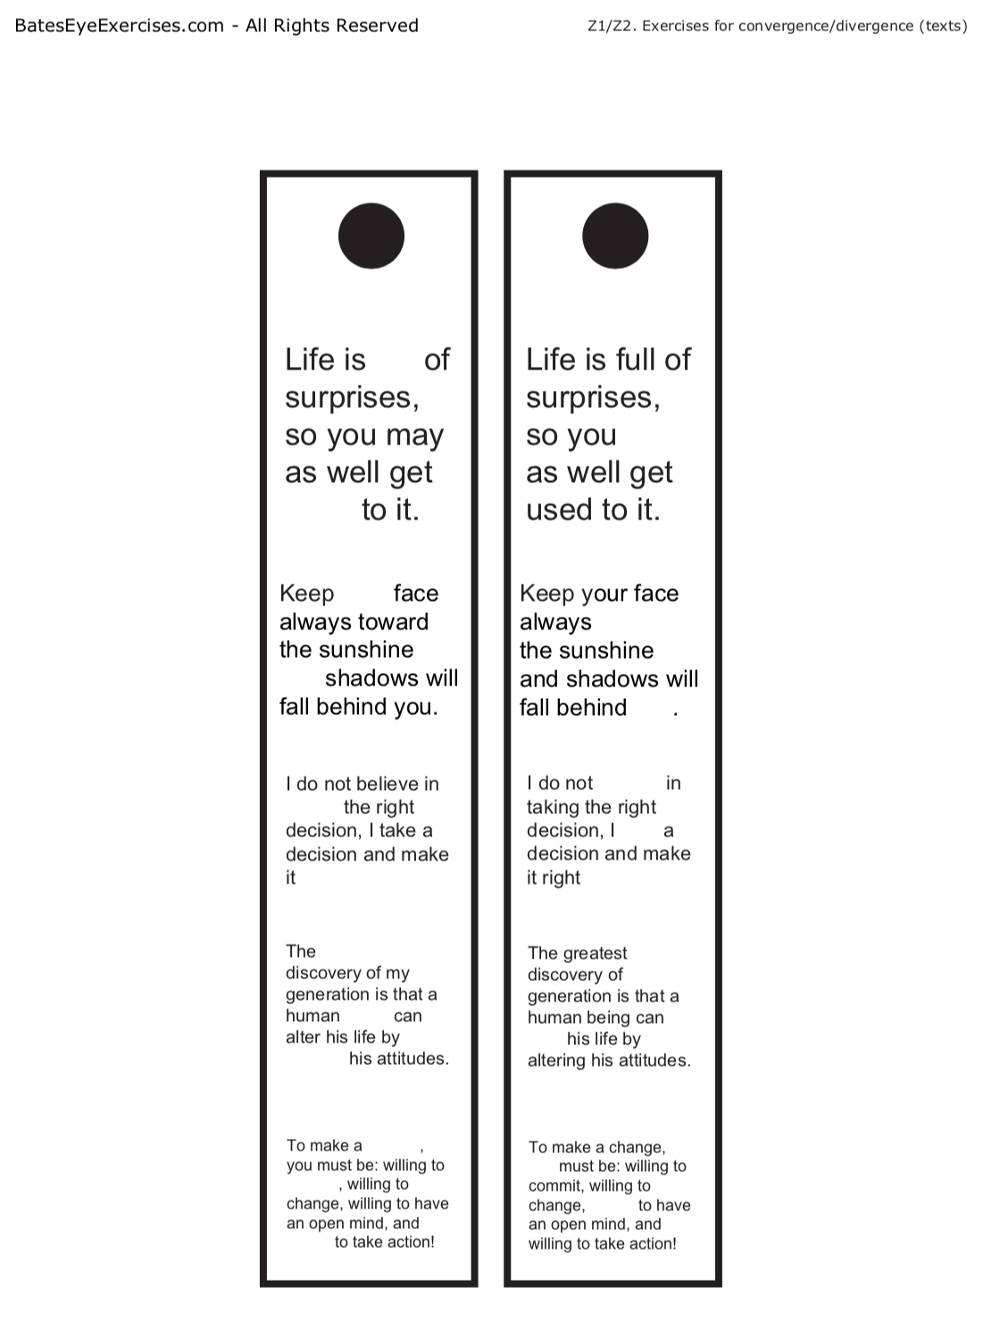
For this exercise, we will use convergence charts. The main goal is to create a virtual image, making each eye work on its own, strengthening coordination between the eyes, and improving eye convergence.
- Take any of the convergence charts and place it about 50–70 cm (19–28 inches) away from you at eye level. Then hold up your thumb (or a pen) at arm's length, halfway between you and the chart, and focus on it while observing the shapes on the chart.
- You should see a total of 4 shapes on the chart. While keeping your eyes converged on the thumb, move it closer or farther away until the 2 inner images merge into one and you see a total of 3 images (2 real, one virtual). With time and experience, you will be able to see the 3 images right away, even without using your thumb.
Exercise Z2. Divergence charts exercise
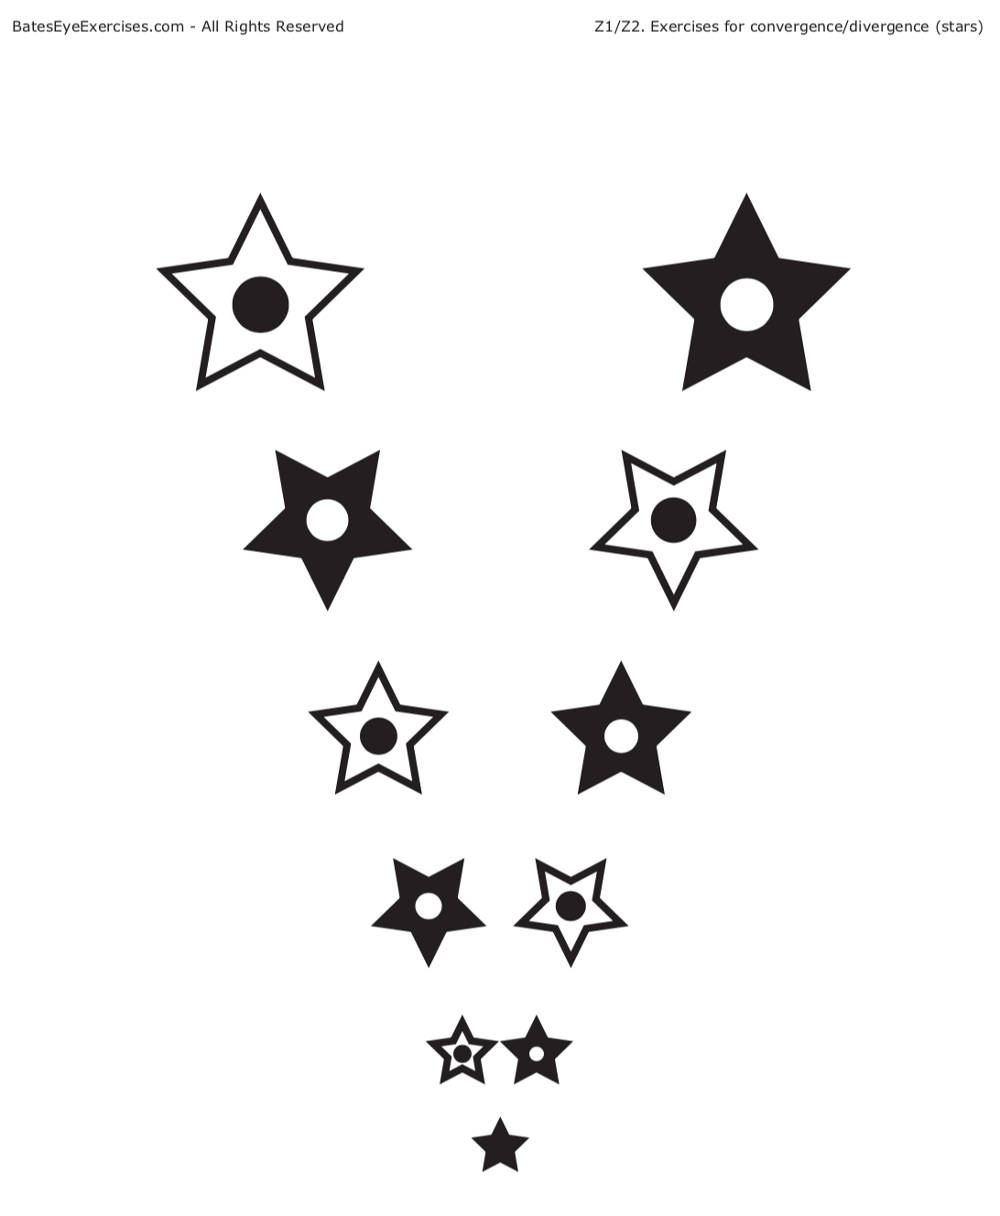
- Take any of the divergence charts and place it about 40–50 cm (16–20 inches) away from you.
- Look between the stars, or simply over the top of the chart, and gaze into the distance. It may help to look at an object several meters (yards) away. When you succeed, you should see a third, "shadow" image — a star appearing exactly between the two on the chart. Adjust the chart's distance so that this third image is as clear as possible, exactly in the middle of the other two.
- Then look at the next row of stars. To see three stars again, you will need to shift your gaze to a slightly shorter distance than for the first row. Look at each of their details. In every row, one star contains a white circle and the other a black one, and their sides alternate from row to row. In the fused middle image, the two circles should overlap symmetrically into one coherent picture. If you see only the white circle, or only the black one, the image from one eye is missing — a sign that this eye is weaker. If the muscles of that eye are also weakened, the central image will drift to one side. If this happens, take a break for a few seconds or blink several times.
- Continue with the next rows down the chart, and then back up again.
- You can also do the star exercise in convergence mode: move the chart slightly farther away and cross your eyes in front of it.
Exercise Z3. Thumb exercise

- Choose a distant object, then hold your thumb up in line with it and focus on the thumb. You should see two images of the distant object.
- While keeping your eyes converged on your thumb, try to observe the left image of the object and notice as many details as possible. Then return to your thumb and repeat the same for the right image of the object. If you have a "lazy eye", you'll notice that one of the object's images (the one seen by the weaker eye) is less distinct. Spend more time working with that eye.
- Now reverse the process. Focus on the distant object — you should see two thumbs. Repeat step 2, observing the left and right images of your thumb in turn.
Exercise Z4. Moving thumb
- Place one of your thumbs at nose level, about 15 cm (6 inches) away from your face. Then place your other thumb about 30 cm (12 inches) away.
- Look at the second, farther thumb. You should see two images of the first thumb, with the farther thumb visible between the split images of the closer thumb.
- Keep your gaze on the farther thumb and slowly move it away from you. Stay aware of the two images of the closer thumb, but keep your focus on the moving thumb. After moving the farther thumb out to arm's length, bring it back toward the closer thumb. Repeat this step several times.
- Throughout this exercise, you should always see two images of the closer thumb. If you see only one, it means that one eye has "switched off". In that case, move the farther thumb back slightly until you see two images of the closer thumb again.
Exercise Z5. Two-string exercise
- Take two strings and thread a few beads onto each one (ideally a different color for each string). Attach one end of each string to a chair, for example, and join their other ends with a single connecting bead, so that you can easily slide the point where the strings converge.
- Now try to converge your gaze on the two farthest beads, the ones nearest the chair. The easiest way is to first look at the connecting bead in front. You should see additional, phantom images of the strings between the two outer strings. Adjust the connecting bead you are looking at until these phantom string images look as parallel as possible.
- Focus on the middle string image — the converged image of the two outer strings. Try to look at each bead along it. If you used differently colored beads on each string, your brain will have to pick a dominant eye, and you will see the image from that eye.
- If you notice that one eye is dominant and the image from the weaker eye is missing, gently shift your gaze to the right or left until the missing bead image reappears. Then converge on the strings again.
Exercise Z6. Scanning net
- Set up the strings the same way as in Exercise Z5, but this time hold their ends about 30 cm (12 inches) in front of you, at chin level.
- Slide the connecting bead about 30 cm (12 inches) away from the hand holding the strings. Look at an object far in the distance (as in the divergence exercises). You should see a double image of the connecting bead and the strings. Beyond the connecting bead, you should see four strings running into the distance, with two sets of end beads at their far ends.
- See how far along you can scan this net; the farther you go, the harder it becomes, as the strings draw closer together. Look at each bead, trying to see it sharply. You can vary the scanning pattern — string by string, every other bead, and so on.
Strabismus theory

Strabismus (squint) is a condition in which an imbalance of the eye muscles changes the angle of one eye relative to the other. The result is a disruption of stereoscopic vision. You can find more information about this condition here.
When training an eye with strabismus, we need to correct the "alignment" of the muscles — that is, influence the coordination of the eyes and bring it back to its natural balance. Strabismus treatment with vision training can be divided into two phases:
- Strengthening eye coordination through convergence exercises and practicing eye muscle flexibility so that the strabismic eye begins to cooperate with the other eye. For this purpose, we use a string as a reference point. The aim is to see a phantom cross, which will become visible when the correct alignment of both eyes and their convergence on the object we want to see is achieved.
- The second phase is training the deviating eye and its main defect (e.g. nearsightedness). This is because the eye affected by strabismus usually has a greater defect than the other eye. Equalizing the sharpness of the two eyes will therefore bring them into better balance and, with it, full correction of the strabismus.
Exercise Z7. Swinging with a mirror

This exercise was developed by Clara Hackett, and its aim is to relax the eyes and make them work together.
- Stand with your back to a mirror, your feet about shoulder-width apart.
- Cover your healthy eye (let's assume it's the right one) with your hand and look straight ahead with the other eye.
Exercise Z8. Balancing swinging exercise
- Stand up straight with your feet about shoulder-width apart and extend your arms out to the sides at shoulder height.
- Always turn your head in the direction opposite to the eye's deviation. For example, if your left eye turns inward or your right eye turns outward, turn your head to the left and, as your head and torso move, look at your left hand.
- Lean your torso to the right, your left hand rising toward the ceiling and your right hand sinking toward the floor.
- Straighten up to the starting position, then tilt your torso to the left, your right hand rising and your left hand lowering. Do this 6–8 times.
- Now switch sides and repeat the exercise, this time looking at your right hand.
- If your right eye turns inward or your left eye turns outward, perform the exercise as described above, but start by turning your head toward your right hand.
Exercise Z9. Trombone exercise
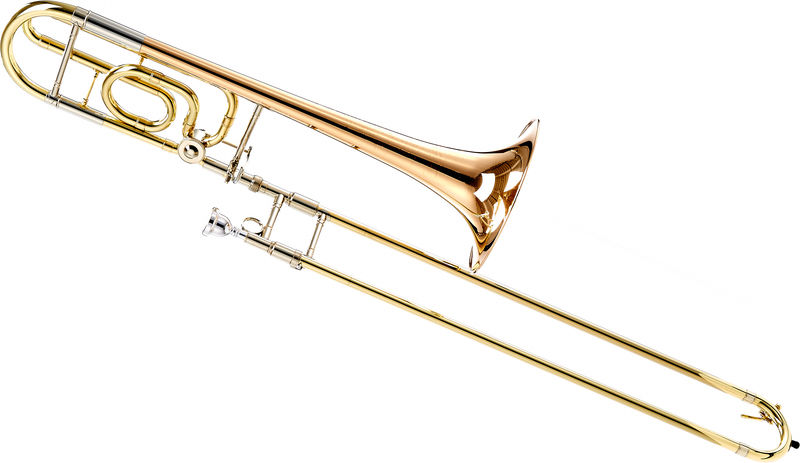
This exercise was recommended by Janet Goodrich. As the name suggests, you move an object back and forth, mimicking the movements of a musician playing a trombone.
- For the exercise, you can use any object the size of a small bottle. It's best to use an object with many interesting elements for your eyes to focus on.
- If, for example, your left eye turns inward, cover your right eye with your hand and move the object from the midline of your body outward to the left. If your eye turns outward, move the object the other way — starting from the outside and ending at your body's midline.
- Once you've completed the first sweep, return the object to its starting position and repeat the movement 5–20 times. You can vary the speed and the range of motion.
Primary source: W. H. Bates, Perfect Sight Without Glasses (1920), ch. 21–22 — full text at Wikisource.